Friday, March 28

Together for Taleah

Hello blogging world!
I haven't written a personal post in quite some time but this week is different.
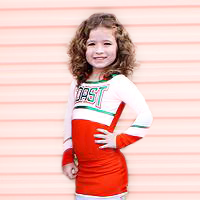
A few years ago, my cousin-in-law found out that her two year old daughter
Taleah had Acute Lymphoblastic Leukemia.
After 2 1/2 years of treatment at Primary Children's in Salt Lake City,
Taleah was cancer free for 4 amazing months.
Just this Monday, her family found out that the cancer had returned.
Taleah has started her second battle for her life at just 5 years old.   


Taleah's family created a video this week as well
to break the news to all of her friends, family, and supporters.
You can read about her story and stay updated through a blog the family created
when she was going through this the first time around.
Not only can you read and follow Taleah's story,
you can donate through the blog as well
and even buy a Together for Taleah wristband for $5
With newborn twins, and a little boy, the Stevenson family needs all the support, thoughts, and prayers they can get.


Taleah is the funniest, sweetest, sassiest, best dancing 5 year old I've ever met.
And she's been braver and stronger than I think I could be.
I'm so blessed to have married into such an amazing family
with amazing extended family that we've grown close to over the years.
Something about this little girl's battle has hit me hard and I'm doing what I can to support where I can.
I know the family appreciates every ounce of support and every prayer they're receiving.
 photo taleah2.png
 photo SiggyR3_zps16c0ecea.png
[all photos in this post were taken by family and friends of Taleah and do not belong to me] 

Sunday, March 16

Baby Boy Shower

I threw a baby shower for my friend at work and wanted to post some pics of the details. 

I posted some How-Tos on the different crafts 

It's hard to make an office look cute but everything turned out great 
and I'm glad I had a lot of help to set up. 

Guest Book
I'm still putting the final look together on this project but this is how it starts: 

I'll post later when this gift is complete and given to mommy-to-be :) 

Gift Table 

Drink Table 
Yes, we have beautiful views of the valley :)
Candy/Dessert Table 
(more people brought desserts after these pictures were taken) 


Baby banner
Should have put the green table cover under the blue banner :) 
Baby blanket 

Shower favors


So much fun and I couldn't be more excited for her little miracle baby. 

 photo SiggyR3_zps16c0ecea.png

Streamer Backdrop

This took a bit of time to make but I was able to recruit my 
sweet husband to help fringe-cut streamers.

I used this streamer backdrop behind the treat table at the baby shower I hosted.

//Supplies: Streamer Backdrop//
Streamers
Fringe Scissors
Tape
Rope/Twine/Yarn
Optional: Fabric, buttons for top of backdrop


Martha Stewart fringe scissors from Hobby Lobby
//Supplies: Dye-cut circle garland//
Paper
Sewing machine
thread

//

Streamer Backdrop

Step 1
Fringe-cut all streamers to be used
-I used a binder clip to keep a stack together as I cut

Sweet husband taking over when my fingers started to hurt :)
Step 2
Drape the streamers over your rope, pinch, and tape the streamer strand together
Over and over and over :)


Circle Garland 

Step 1
Cut out circles.
Everyone has their own way. I used my cricut since it could cut out 36 at a time.

Step 2
Prepare your machine and begin to sew like any other project.
Back stitch a couple of time on the first circle, then continue to feed the circles through one after the other. space them as you'd like.


Step 3
Back stitch a few times when you get to the end.

Step 4
Drape over streamer backdrop and tie a know so it stays in place.

I didn't like the look of the top of the backdrop so I found some leftover fabric from an old project.
I hemmed the edges so it was clean looking.

I then folded it in half over the top and hand stitched a couple of stitches so it wouldn't move.
Then I sewed on a few large buttons just to add to it since it was for a baby shower.


 photo SiggyR3_zps16c0ecea.png

Baby Boy Banner

I love making banners - you can go to my "Crafts" tab on the left side of the page 
to see more of my other banners.

I also made this for my co-worker's baby shower.
This one was simple and quick to make; thanks to my Cricut of course. 

I wish I would have taken more pics! 

I cut out the banner shapes, and personalized the hot air balloon image they had on a cartridge. 
The baby onesie banner was already on the Cricut cartridge as well. 

*If you love to craft, I seriously recommend investing in a Cricut - I will always sing its praises :) 

I then free-handed the letters since I haven't upgraded my Cricut for extra fonts yet. 


Green with white polkadots. Green/white chevron

This turned out so cute and the mommy-to-be kept it for her other showers as well :)

See the full baby shower I hosted here.

Should have put the green table cover under the blue banner :) 
 photo SiggyR3_zps16c0ecea.png

Cake Topper Banner

These are all over Pinterest but here's the banner I made for a cake I also made for the 
baby shower I threw at work.  


//Supplies//
String/Yarn
2 dowels 
Paper
Hot Glue 

I had all of these supplies on hand so it was another free project :) 

Step 1 
Cut out this "kite" shape for the banner. 
This way, it will easily fold over the yarn line.


Step 2
Fold across the center points 

Step 3
String the yarn across the crease

Step 4 
Place a dot of hot glue on the short triangle tip and press sides together. 
This will allow you to slide the banner pieces around where you want them. 
Fuzzy projects gunked up my gun lol 

Once your cake is ready to present, 
shove the dowels in at an outward angle
and wrap the yarn around the ends. 

Such a cute cake topper and so easy! 

PS... I hate making cakes lol I'll just buy one next time.
I can craft but I can't bake lol

 photo SiggyR3_zps16c0ecea.png

Applique Baby Clothes


I appliquéd some baby clothes to make a clothesline for a baby shower 
I threw at work for my friend. 
(It’s hard to make an office look adorable lol)


I bought a t-shirt, onesies, and a bib from Hobby Lobby. 
They sell them so cheap so it makes personalizing baby clothes really affordable.

// Supplies //
Baby clothing item
Heat N Bond iron on adhesive
Fabric for designs
Sewing machine and thread

I had left over Heat N Bond and used fabrics I already had 
so this was basically a no-cost project for me :) 

Step 1
Iron on your heat n bond to your design fabric according to the instructions on the package. 
Don’t peel the paper backing off yet.

Step 2
Trace or free hand your designs on the paper backing 

Step 3
Peel off the adhesive paper

Step 5
Design right side up, place it on your clothing item and iron on so the glue starts sticking


I also sewed a button on for the eye to add a little something
Mustache design
Tie design
Sailboat design


Step 6
I used a zig-zag stitch all around the designs; this will keep the designs from peeling off. 


These are so easy and so cute. 
I definitely think I'll be making some of my own one day lol 

Cute pregnant Danielle
 photo SiggyR3_zps16c0ecea.png